As you wander through your yard, you may notice peculiar tunnels and mounds located beneath your feet. These mysterious formations could be the work of moles, a common pest that plagues homeowners. But how do you know for sure? Identifying mole tunnels and mounds can be a perplexing task, but with the right information and a keen eye, it is possible to detect and prevent these unwelcome critters from wreaking havoc in your lawn. In this comprehensive guide, we will explore the appearance and location of mole tunnels and mounds, methods to confirm mole activity, and preventative measures you can take to control and eliminate mole infestations. So, let’s dive into the world of mole control and learn how to get rid of these pesky pests for good.
Identifying Mole Tunnels
Identifying mole tunnels in your yard can be a perplexing task, but it’s essential for eradicating these underground pests. Moles are known for creating tunnels as they burrow through the soil in search of food, and their burrows can cause extensive damage to your lawn and garden. Understanding how to identify mole tunnels is the first step in mole control. In this section, we’ll cover the appearance, location, and damage caused by mole tunnels, as well as how to distinguish active and old tunnels. By the end of this section, you’ll have a better understanding of mole activity in your yard and be better equipped to address the issue. To learn more about mole damage and how it compares to other pests, check out our article Mole Damage vs. Pests.
Appearance of Mole Tunnels
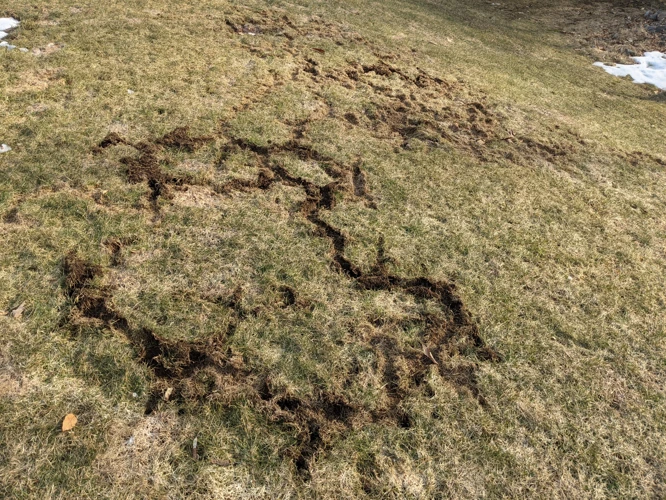
When identifying mole tunnels, it is important to be aware of their appearance. Mole tunnels are typically created just below the surface of the ground and can range from 1-2 inches in diameter. They are often noticeable due to the raised ridge or raised line of soil that is pushed up as the mole moves through the ground. These raised ridges can be seen winding through the yard and garden, creating a network of channels that the mole uses to travel and forage for food.
The soil texture around mole tunnels may appear looser due to the soil displacement that occurs during tunnel formation. Mole activity in soil may create a patchy effect, leaving areas of uneven terrain around the tunnel sites.
It is important to note the differences in the appearance of active and old mole tunnels. Active mole tunnels will typically have a higher concentration of soil disturbance with softer or fresher soil. However, old tunnels will have a more settled appearance with more compacted soil.
Table 1: Appearance of Mole Tunnels
| Appearance | Characteristics |
|---|---|
| Raised ridges or lines | 1-2 inches in diameter, network of channels |
| Looser soil texture | soil displacement creates patchy terrain |
| Differences in appearance of active and old mole tunnels | active tunnels have softer soil and more soil disturbance, while old tunnels have a more settled appearance with more compacted soil |
Identifying mole tunnels requires an eye for detail and knowledge of their distinct appearance. By understanding the look and characteristics of mole tunnels, property owners can better determine the extent of their mole infestation and take action to prevent further damage from occurring, such as the damage they can cause to lawns or the presence of mole larvae in the soil.
Location of Mole Tunnels
When it comes to location, moles can create their tunnels anywhere in your yard. However, they often prefer areas with moist and loose soil which makes it easier for them to dig. Some common locations where mole tunnels can be found include:
- Near gardens or flower beds with well-irrigated soil
- Under shaded areas with constant moisture
- Around trees or bushes where the soil is soft and loose
- Along sidewalks or driveways
- Underneath decks or patios
- Along fence lines or property borders
Moles also tend to create their tunnels in areas with ample food supply, such as areas with grubs or earthworms. This is because moles primarily feed on insects that live in soil. For more information on detecting mole larvae and adult moles in soil, refer to our previous article at (insert anchor link here).
When trying to locate mole tunnels, you will also want to keep an eye out for surface activity such as raised ridges or depressions. These may indicate the presence of mole tunnels underneath, particularly if they appear in a grid-like pattern. Understanding the location of existing mole tunnels can help you to detect active mole tunnels more quickly and take preventative measures to keep moles out of your yard.
Damage Caused by Mole Tunnels
The presence of mole tunnels in your yard can cause a variety of damages that may escalate the longer the infestation goes unchecked. Here is a table outlining some of the damages caused by mole tunnels:
| Damage Caused by Mole Tunnels | Description |
|---|---|
| Mole Hills | The buildup of soil that results from creating tunnels can lead to unsightly mounds of soil in your yard, disrupting the aesthetics of your lawn. |
| Killing your plants | Moles tunneling can disrupt the soil beneath your plants, causing them to uproot and die. This is especially critical in areas where you are growing delicate flowers or vegetables |
| Unstable Yard | The tunnels left by moles can cause your yard’s foundation to become unstable, leading to soil erosion or other long-term damage. |
| Damage to your Lawnmower or Garden Equipment | The tunnels created by mole activity can lead to holes in your yard where the blades of your lawnmower or garden equipment may become stuck, causing further disruption and harm. |
| Pest Infestations | The burrows left by moles can become havens for other pests, such as various insects or rodents, which can further damage your lawn and garden. |
If you have noticed any of these signs, it’s important to take action as soon as possible. Ignoring the presence of mole tunnels can lead to more extensive and expensive damage to your yard in the future.
How to Identify Active Mole Tunnels
When it comes to identifying active mole tunnels in your yard, there are several steps to follow in order to determine if the tunnels are currently in use by moles. Here are some key tips to keep in mind:
- Step 1: Flatten any raised tunnels carefully by hand, ensuring that you smooth over the area as much as possible
- Step 2: Mark the spot where you have flattened the tunnel with a clearly visible object such as a flag or stake
- Step 3: Check the flattened spot the next day to see if the tunnel has been rebuilt by the mole overnight. If the tunnel has been rebuilt, it is an active tunnel
- Step 4: Alternatively, you can use a small amount of flour or fine sand to determine if the tunnel is active. Sprinkle the powder over the tunnel and wait for the mole to clear it. If the powder has been disturbed, the tunnel is active.
It’s important to note that moles are most active during the early morning and late evening hours, so be sure to check the tunnels during these times for the best chance of seeing activity. By identifying active mole tunnels, you can more effectively target and eliminate the pests from your yard.
Identifying Old Mole Tunnels
Over time, mole tunnels can become abandoned and lose their activity. It’s important to be able to identify old and inactive tunnels so that you can focus your control efforts on the areas where moles are still present.
Signs of an old mole tunnel:
| Signs | Description |
|---|---|
| No fresh soil | Old mole tunnels will not have any fresh soil mounds or disturbance around the entrance. |
| Inconsistent shape and size | Old tunnels can collapse or be filled in by other means, causing them to have an inconsistent shape and size. |
| Grass growth | Because moles dig tunnels underground, the grass above the tunnel may appear healthier and grow faster than surrounding areas. However, this will not be present on old tunnels, as the grass will have had time to recover and grow back normally. |
| No new activity or damage | If the area surrounding the old tunnel has no recent evidence of mole activity or damage, then it is likely that the tunnel is no longer in use. |
Identifying old mole tunnels is important, as they will not need to be treated for mole activity. There is no need to waste time or resources by attempting to control moles in areas where they are not present. By focusing your control efforts on the areas where mole activity is still occurring, you can effectively and efficiently control the population and prevent future damage.
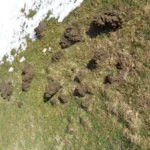
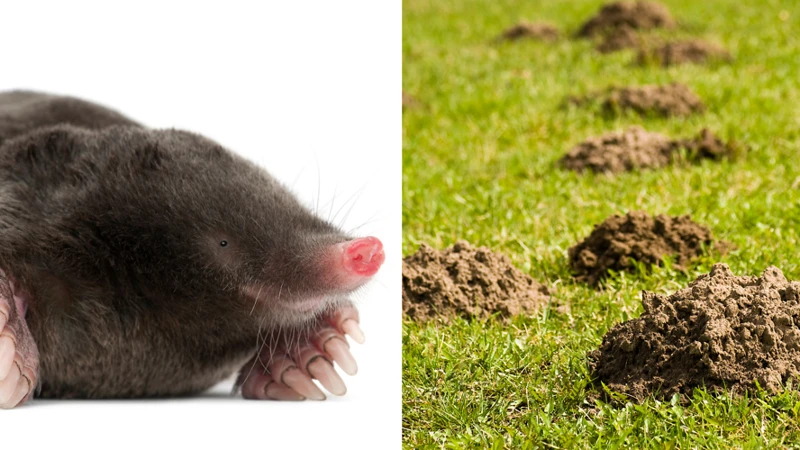
Identifying Mole Mounds
As you inspect your yard for any signs of mole infestation, you might come across raised mounds of soil that indicate the presence of moles. These mounds can be confusing to distinguish from other animal burrows or holes in the ground, but identifying them accurately is essential to determine the extent of mole activity and plan suitable control methods. It is crucial to pay attention to the appearance, location, and features of mole mounds, and observe their activity over time. In this section, we will delve into the details of identifying mole mounds and differentiating them from other types of animal mounds.
Appearance of Mole Mounds
Mole mounds are one of the most common signs of mole activity in your yard. These mounds often give a good indication of the approximate location of the mole’s tunnel. Here are some characteristics to look for when identifying mole mounds:
- Size: Mole mounds can vary in size, ranging from a few inches in diameter to several feet across.
- Shape: Mole mounds are typically circular or oval-shaped and may be slightly raised or domed in appearance.
- Color: The color of mole mounds varies depending on the soil type in your yard. They can be dark brown, light brown, or even light gray in color.
- Texture: Mole mounds may be slightly rough or smooth to the touch, depending on the type of soil in your yard.
- Location: Mole mounds are often located along the path of the mole’s tunnel, but they can also be found in open areas where the mole has been digging for food.
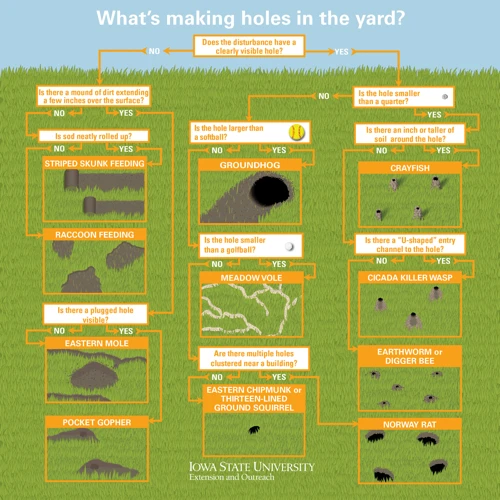
It’s important to note that mole mounds can be confused with those of other pests such as pocket gophers or ground squirrels. If you are unsure, it is always a good idea to consult with a pest control professional for confirmation.
Location of Mole Mounds
When it comes to identifying mole mounds, one important factor to consider is their location. Mole mounds can appear anywhere in a yard, but they tend to be most prevalent in areas with loose soil, such as gardens, flowerbeds, and lawns. Mole mounds may be more likely to appear in areas with a high concentration of earthworms and other soil-dwelling creatures, as these are a primary source of food for moles.
To help identify the location of mole mounds in your yard, it can be helpful to keep a close eye on areas where you have noticed signs of mole activity, such as tunnels or damage to plants. You may also want to take a walk around your yard on a regular basis to look for new mounds that may have appeared.
Another way to identify the location of mole mounds is to keep an eye out for areas of your yard that appear raised or bumpy. Mole mounds tend to be small, rounded piles of soil that can range in size from a few inches to several feet in diameter, depending on the severity of the infestation. To help keep track of the location and size of mole mounds in your yard, you might consider making a simple map of your property and marking any mounds you find.
| Factors Affecting Location of Mole Mounds: | Examples: |
|---|---|
| Areas with loose soil | Gardens, flowerbeds, lawns |
| Areas with high concentration of earthworms and other soil-dwelling creatures | Near compost piles, under bird feeders, areas with dense vegetation |
| Areas previously affected by mole activity | Tunnels, damage to plants |
By understanding the various factors that can affect the location of mole mounds, you can take steps to prevent and control mole infestations in your yard. Whether you choose to create physical barriers, remove sources of food, or work with a professional mole control service, identifying the location and severity of the infestation is an important first step in the process.
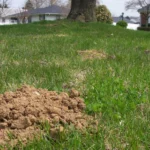
Size and Shape of Mole Mounds
When it comes to identifying mole mounds in your yard, it’s important to pay attention to their size and shape. Mole mounds typically range in size from about 5 to 8 inches in diameter, and can be up to several inches high. These mounds are typically symmetrical, with a circular or conical shape.
Small mounds: If you notice small, symmetrical mounds throughout your lawn or garden, it could be a sign of a mole infestation. These small mounds typically indicate that the mole is actively digging through the soil in search of food.
Large mounds: On the other hand, larger mounds that are irregular in shape may indicate that the mole is digging multiple tunnels or is actively tunneling in search of a suitable place to establish a new burrow.
Conical mounds: Some mole mounds may have a conical shape with a raised center. This type of mound is often created when the mole is pushing soil up from a deeper tunnel, and typically indicates that the mole is actively digging deeper in search of food or a suitable location for a new burrow.
Crescent-shaped mounds: Another type of mole mound you may encounter is one with a crescent shape. These mounds are typically formed when the mole is digging along a surface, such as a pavement or a foundation, and the soil is pushed up to one side of the tunnel.
By paying attention to the size and shape of mole mounds, you can get a better idea of the extent of the mole infestation in your yard and take appropriate action to address the problem.
Distinguishing Mole Mounds from Other Types of Animal Mounds
When trying to identify whether a mound in your yard is created by moles or by other animals, there are a few key differences to take note of. Some potential culprits for mounds in your yard include gophers, voles, and ground squirrels, as well as some larger animals like rabbits, deer, and even humans. Here are some ways to distinguish mole mounds from other animal mounds:
- Shape: Mole mounds tend to be more circular in shape, while other animal mounds may be more oblong or irregularly shaped.
- Size: Mole mounds are usually smaller in size than other animal mounds. They may be as small as a golf ball or as large as a grapefruit, but they are generally not as large as a basketball or bigger.
- Location: Mole mounds are often found in grassy areas or in gardens, whereas other animals may be more likely to make mounds in dirt or soil.
- Entrances: Mole mounds typically have one or two small entrances, while other animal mounds may have multiple entrances or no visible entrances at all.
- Contents: If you dig into a mole mound, you may find a tunnel system underneath. Other animal mounds may not have an extensive tunnel system, or may contain the burrow of the animal that created it.
By taking note of these characteristics, you can get a better sense of whether the mounds in your yard are created by moles or by other animals. However, it’s important to note that identifying the specific type of animal responsible for the mounds is only one piece of the puzzle when it comes to getting rid of them. Depending on the severity of the infestation and the type of animal causing the problem, different methods may be required to effectively control the population and prevent further damage.
How to Identify Active Mole Mounds
One way to determine if a mole mound is active is to look at the freshness of the soil. Here are steps to identify active mole mounds:
- Step 1: Look at the soil in the mole mound. If it is light and fluffy, it may be fresh and active.
- Step 2: Check for signs of new digging or tunneling around the mole mound. This indicates that the mole is actively digging and creating new mounds.
- Step 3: Observe the shape of the mound. Active mole mounds tend to be symmetrical and conical in shape.
- Step 4: Check for moisture in the soil. Active mole mounds may have a damp and cool feeling due to the moisture from the dug tunnels.
- Step 5: Observe the size of the mole mound. If it is larger than six inches in diameter, it may be an indication of an active mole infestation.
It is important to note that even if a mole mound is inactive, it does not mean that the moles have permanently relocated. Moles are known to temporarily abandon tunnels and mounds, making it difficult to determine if they are still present in your yard. It is important to regularly check for signs of activity to prevent further damage to your lawn or garden.
Identifying Old Mole Mounds
When identifying old mole mounds, there are a few key features to look for:
- Flat Appearance: Old mole mounds will appear flatter than active mounds, as the soil has settled over time.
- Discolored Soil: The soil in old mole mounds may be discolored or appear darker than the surrounding ground due to exposure to the elements.
- No Fresh Soil: Unlike active mounds, old mounds will not have fresh soil or a raised dome shape, as moles are not currently actively creating new tunnels or pushing up soil.
It can still be helpful to identify old mole mounds, as they can indicate past mole activity in the area and the potential for future infestations. Additionally, if old mole mounds are located near new activity, it can help identify where the problem may be originating from.
Methods to Confirm Mole Activity
Identifying the presence of moles in your yard is crucial in order to prevent damage caused by their tunneling and mounding activities. However, sometimes it can be difficult to determine whether or not moles are the culprit for the damage. To confirm the presence of these small mammals, several methods can be used, including using water, traps, or seeking the help of professional mole control services. In this section of the guide, we will explore each method in more detail to help you determine if moles are, in fact, active in your yard or garden.
Use of Water
One effective method for confirming the presence of moles in your yard is the use of water. To do this, simply water the area around suspected mole tunnels or mounds. After a few minutes, check to see if water is being pushed up to the surface. If so, this indicates that there is a tunnel or chamber directly below.
Some tips to keep in mind when using this method include:
- Use a garden hose or sprinkler system to water the area.
- Do this during dry spells or periods of drought when soil is dry and easier to penetrate.
- Be patient – it may take up to 10 minutes for the water to reach a tunnel or chamber deep beneath the surface.
- Water several areas suspected of mole activity, to confirm the presence of more than one mole.
It is important to note that this method is only useful for confirming the presence of moles, and should not be relied upon as a sole method of mole control. Once you have confirmed that moles are present in your yard, it is important to take action to prevent further damage and control their population.
Use of Traps
Traps can be a humane and effective way to control mole populations in your yard. There are several types of traps available, including scissor traps, spear traps, and harpoon traps. These traps are placed directly in the mole tunnels and are triggered when the mole passes through.
| Trap Type | Pros | Cons |
|---|---|---|
| Scissor Traps | Easy to set up and use | May injure or kill non-target animals |
| Spear Traps | Effective at killing moles | Difficult to set up and use |
| Harpoon Traps | Relatively easy to set up | May require multiple traps to be effective |
It is important to place traps correctly in order to increase their effectiveness. Traps should be placed in active mole tunnels, which can be identified by checking for fresh soil and loose tunnel walls. Traps should be set perpendicular to the tunnel and covered with soil to prevent light from entering, which can alert the mole to their presence.
It is also important to check traps frequently and to dispose of any captured moles in a humane manner. In some areas, it may be necessary to obtain a permit to use traps or to hire a licensed professional for mole control.
Professional Inspection
One of the most effective ways to confirm mole activity is through a professional inspection. Professional inspectors have the knowledge and experience to identify the presence of moles and assess the extent of the damage they have caused.
During a professional inspection, the inspector will typically conduct a thorough examination of the yard and garden, looking for signs of mole activity such as tunnels and mounds. The inspector may also use specialized equipment such as infrared cameras and moisture probes to detect areas of underground activity.
The following table outlines the benefits and drawbacks of a professional mole inspection:
| Benefits | Drawbacks |
|---|---|
| Accurate assessment of mole activity and damage | Can be expensive, depending on the scope of the inspection |
| Expert recommendations for controlling and preventing mole infestations | May require scheduling an appointment and waiting for availability |
| Professional-grade equipment and techniques can provide more detailed and accurate information | Some homeowners may prefer to take a more proactive, DIY approach to mole control |
A professional inspection can be a valuable tool for identifying and addressing mole activity in your yard. While it may require an investment of time and money, it can provide a more accurate and effective solution to a mole infestation than other methods such as home remedies or traps.
Preventing and Controlling Mole Infestations
As frustrating as mole infestations may be, there are several preventative measures and control methods that can be implemented to rid your yard of these pests. By utilizing a combination of barriers, food source removal, and repellents and poisons, and potentially enlisting the help of professional mole control services, you can effectively take control of your yard and prevent future mole infestations. Let’s explore these methods in more detail.
Creating Barriers
One effective way to prevent and control mole infestations is by creating barriers around your property. This can involve a variety of methods, including:
- Installing fencing: A sturdy fence that extends at least a foot underground can help keep moles out of your yard.
- Laying down mesh: Placing mesh barriers underground can also be an effective way to prevent moles from tunneling into your yard.
- Using hardware cloth: Similar to mesh barriers, hardware cloth can be laid down in areas where moles are known to tunnel.
- Placing rocks or gravel: An inexpensive method of creating barriers, placing large rocks or gravel in areas where moles are active can discourage them from tunneling.
Creating barriers can be a highly effective method of preventing mole infestations, but it’s important to keep in mind that it won’t necessarily eliminate moles that are already present. In order to effectively control and remove moles from your yard, it’s important to take additional steps, such as removing their food sources, trapping them, or using professional mole control services.
Removing Food Sources
One effective way to prevent and control mole infestations is by removing their food sources. Moles primarily feed on insects, grubs, and earthworms found in the soil. Here are some steps you can take to reduce the availability of these food sources:
| Step | Details |
|---|---|
| 1. Maintain a healthy lawn | Regularly mow the lawn and remove any thatch buildup, which can attract insects. Consider overseeding with a variety of grass types that are more resistant to insect infestations. |
| 2. Keep the soil well-drained | Moles prefer moist soil, so avoid overwatering and improve drainage in areas where water tends to accumulate. |
| 3. Avoid using pesticides | Pesticides can kill earthworms and other insects that moles feed on, but they can also harm beneficial insects and other wildlife in your yard. |
| 4. Use biological controls | You can introduce natural predators of grubs and other insects into your yard, such as nematodes or predatory insects like ladybugs and lacewings. |
By removing food sources for moles, you can reduce their presence in your yard and prevent further damage to your lawn and garden. Nonetheless, these preventative measures may not be effective against an established mole infestation. If you suspect that you have a mole infestation, it’s important to consider professional mole control services to identify and remove the moles effectively.
Using Repellents and Poisons
When it comes to controlling mole infestations, repellents and poisons can be very effective. Here are some options to consider:
- Castor oil-based repellents: These products work by making the mole’s food source (earthworms, grubs, etc.) taste bad, causing them to move elsewhere. They are both safe and effective when used properly.
- Smoke bombs: Smoke bombs can be used to drive moles out of their tunnels, making them easier to capture or kill. However, they can be dangerous if not used correctly and may harm other wildlife in the area.
- Mole bait: There are a variety of mole baits on the market, but it’s important to use them carefully as they can be toxic. Always follow the instructions on the package and keep them away from children and pets.
- Zinc phosphide: This is one of the more effective mole poisons, but it is also highly toxic and can be dangerous to use. It should only be applied by professionals.
- Mole traps: There are a variety of mole traps available, including both lethal and non-lethal options. If you choose to use a trap, be sure to read the instructions carefully and check it often to avoid leaving a live mole trapped for too long.
It’s important to keep in mind that while these options may be effective in the short term, they may not provide a long-term solution to a mole infestation. In some cases, professional mole control services may be necessary to fully address the issue and prevent future problems.
Working with Professional Mole Control Services
Working with Professional Mole Control Services
- Consulting with a professional mole control service is a good idea if you’re unable to effectively control the infestation on your own.
- Trained professionals have a better understanding of mole behavior, habitat and the best control methods to use.
- They can help you identify the extent of the problem and recommend the best course of action.
- Finding the right service provider requires research to ensure you’re hiring a reputable company.
- Check the company’s credentials, experience, and licensing before hiring them.
- Ensure the company is using humane and safe methods to control the infestation.
- Professional services can offer trapping services, baiting or fumigation techniques to control the mole infestation.
- They may also offer preventative measures to avoid future mole infestations.
- Working with a professional mole control service may be more expensive than doing it yourself, but it’s worth it to avoid long-term damage to your property and to have peace of mind knowing the problem is being properly managed.
Conclusion
In conclusion, identifying mole tunnels and mounds in your yard is crucial in maintaining a healthy and aesthetically pleasing lawn. The damage caused by moles can lead to costly repairs and also ruin the beauty of your yard. Knowing what to look for is the first step in controlling and preventing mole infestations.
Identifying mole tunnels involves looking for raised ridges or raised soil that runs throughout your yard. The location of mole tunnels may vary depending on the species, but they are commonly found in shaded areas or near a water source. The damage caused by mole tunnels can include uprooted plants and dead grass, which can be unsightly and dangerous to your pets.
Identifying mole mounds is vital in determining the extent of the infestation. Mole mounds are raised piles of soil that cover the entrance of a mole tunnel. They may vary in size and shape depending on the species and can be found in any area of your yard. Distinguishing mole mounds from other types of animal mounds can be challenging, but it is essential in preventing further damage.
There are methods to confirm mole activity, including using water to flood mole tunnels or traps to capture them. Professional inspection is also an option for those who are unsure of the extent of the infestation. Preventing and controlling mole infestations involves creating physical barriers, removing food sources, and using repellents and poisons. Working with a professional mole control service is also an option for those who need additional help.
Overall, identifying and controlling mole infestations is essential to maintaining a beautiful and healthy lawn. By following the steps outlined in this guide, you can ensure that your yard remains in pristine condition year-round. Remember, prevention is key when it comes to mole infestations, so be sure to take the necessary steps to protect your property.
Frequently Asked Questions
How do moles create tunnels?
Moles dig their tunnels using their powerful front paws and their streamlined bodies, which make them capable of moving forward and backward through tunnels with ease.
What do mole tunnels look like?
Mole tunnels appear as raised ridges or mounds of soil that run across your lawn or garden.
How can I tell the difference between an old and active mole tunnel?
An active mole tunnel will have fresh soil pushed up along the ridges and may have vegetation recently cut or nibbled off. Old tunnels will appear sunken with no new soil and may be overgrown.
What do mole mounds look like?
Mole mounds are typically circular or oval-shaped mounds of soil that protrude above the surface of your lawn or garden, often with a hole in the center.
Can moles be harmful to my garden or lawn?
Yes, moles can harm your garden or lawn by disrupting plant roots and causing damage to your lawn with their tunnels and mounds.
Are there any natural repellents for moles?
Several natural repellents can deter moles, including castor oil, garlic, and even human hair. However, these repellents are not always effective and may require repeated applications.
Can I trap moles myself?
Yes, it is possible to trap moles yourself with commercial mole traps. However, it can be difficult to correctly identify active tunnels and place the traps in the right location. It is recommended to seek professional assistance.
Are there any preventive measures for mole infestations?
Yes, preventive measures include creating physical barriers, removing food sources, and using repellents such as castor oil or vibration devices.
Can I use poison to eliminate moles?
It is not recommended to use poison for mole control as it can harm other wildlife and pets in the surrounding area, and it is also not always effective in controlling mole populations.
Is it necessary to remove mole mounds and tunnels once eradicated?
It is recommended to remove mole tunnels and mounds once moles have been eradicated to prevent any further infestations or damage to your lawn or garden.