As a gardener, there are few things more frustrating than discovering unsightly mole damage in your beloved outdoor space. These underground tunnelers wreak havoc on lawns, plant roots, and even irrigation systems. Protecting your garden from these pesky critters can feel like an endless battle, but fear not! With a little knowledge and effort, creating a mole barrier around your garden is not only possible, but also simple and effective. In this article, we’ll walk you through the steps to create a physical mole barrier and provide tips for maintaining it over time.
Understanding Moles and Their Behavior
As a gardener or landscaper, dealing with moles can be a frustrating task. Understanding the behavior of these creatures is crucial in determining the most effective way to prevent them from causing damage in your garden. It’s important to recognize the signs of mole activity and identify the type of damage they cause. To effectively create a mole barrier, you must have an idea of their behavior and patterns. In the following sections, we will explore the mole behavior and infestations, and provide you with some tips on preventing mole damage. If you’re interested in learning more about prevention techniques, check out our article on DIY mole prevention techniques.
Identifying Mole Damage
Mole damage can be very frustrating for gardeners, but before you can figure out how to prevent it, you need to make sure that the damage is actually caused by moles. Here are some signs that you have a mole problem:
| Signs of Mole Damage | Description |
|---|---|
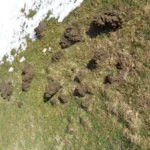
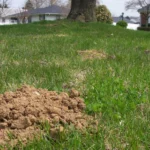
| Mounds of soil: | When moles dig tunnels, they push up mounds of soil as they go. These mounds can be larger than those made by other burrowing animals. |
| Surface tunnels: | Moles dig tunnels just below the surface of the soil, so if you see shallow grooves or ridges in your lawn or garden bed, it could be a sign of mole activity. |
| Damaged roots: | Moles eat insects and grubs, but they can also damage plants by digging up their roots as they tunnel through the soil. |
| Wilting plants: | If you see plants that are wilting for no apparent reason, it could be because their roots have been damaged by moles. |
If you see any of these signs, it’s a good idea to take action to prevent further mole damage. For more information on mole behavior and infestations, check out our article on mole behavior and infestations. To learn about different methods of mole prevention, including natural and chemical options, see our article on best mole prevention tips.
Understanding Mole Behavior
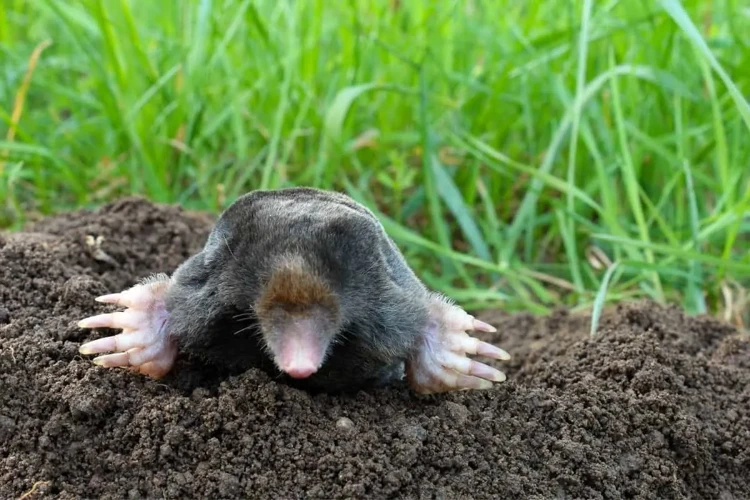
To create an effective mole barrier, it’s important to understand mole behavior and why they may be attracted to your garden. Moles are small burrowing mammals that typically live in underground tunnels. They are known for creating raised ridges or mounds in lawns and gardens, which can be unsightly and damage plant roots.
Here is a table outlining some key behaviors and preferences of moles:
| Mole Behavior | Description |
|---|---|
| Sensory organs | Have poor eyesight and rely on their sense of touch and smell to navigate and find food |
| Diet | Feed primarily on insects, earthworms, and other small invertebrates found in soil |
| Tunneling | Create complex networks of tunnels to forage and nest in, which can span large areas and cause damage to plant roots |
| Soil types | Prefer loose, moist soil with abundant prey, but can also live in sandy or heavy clay soils with less food availability |
| Companion planting | May be deterred by certain plants, such as daffodils, alliums, and marigolds, that have natural pest-repelling properties (learn more about companion planting for mole prevention) |
| Ultrasonic repellents | May be deterred by certain ultrasonic sound frequencies, emitted by devices such as sonic mole repellents |
By understanding mole behavior and preferences, you can better choose a mole barrier that will effectively keep them out of your garden. Depending on your specific situation, you may choose to use natural, chemical, or physical barriers (learn more about some options in the following section).
Mole Barrier Options

Protecting your garden from mole damage is essential to keep your outdoor space healthy and aesthetically pleasing. While there are various natural remedies and products that claim to deter moles, creating a physical barrier is often the most effective way to prevent their intrusion. In this section of the article, we’ll explore different mole barrier options that you can use to ensure your garden remains a lush paradise. Whether your garden is situated in clay soil or sandy loam soil type, or you want to keep the maintenance low with a simple physical barrier, we have you covered. So, let’s move on and find which type of barrier works best for your garden’s specific needs. Don’t forget to check our previous post on preventing mole damage tips to learn more about mole behavior and damage identification.
Natural Barriers
One way to create a mole barrier is to make use of natural barriers. Natural barriers are materials that are readily available in nature and are often more environmentally friendly than other options.
Here are some examples of natural barriers that can be used:
| Material | Pros | Cons |
|---|---|---|
| Gravel or stones | Allows for water drainage, can be attractive in landscaping | May require frequent maintenance to keep moles from tunneling underneath |
| Sharp objects like pine cones, holly leaves, or acorns | Repels moles without harming them | May get displaced by wind or rain |
| Plants with strong scents, like alliums, marigolds, or daffodils | Repels moles and adds to the beauty of the landscaping | May not be as effective as other barriers if the plants are not in sufficient quantity |
It is important to note that different soil types may require different natural barrier options. For example, clay soil may require a different approach than sandy soil. It is also important to monitor the effectiveness of the barrier and make changes as necessary.
Chemical Barriers
Chemical barriers can be an effective way to deter moles from your garden. These types of barriers work by producing an unpleasant odor or taste that will keep moles away. But it is important to note that chemical barriers can also be harmful to other animals and the environment if not used properly.
Before using any type of chemical barrier, it is important to research and follow the instructions carefully. Here are some commonly used chemical barriers and how they work:
| Chemical Barrier | How it Works | Tip for Use |
|---|---|---|
| Castor Oil | Castor oil is a natural mole repellent that works by making the soil taste and smell unpleasant to moles. | Apply castor oil directly to the soil and water it in. Reapply every few weeks or after heavy rain. |
| Mothballs | Mothballs contain naphthalene, which is toxic to moles. The strong odor will also deter them from the area. | Place mothballs in mole tunnels or near mole activity areas. Keep away from children and pets. |
| Blood Meal | Blood meal is a natural fertilizer made from dried animal blood. The high nitrogen content is attractive to moles, but the smell can be overwhelming and deter them from the area. | Apply blood meal directly to the soil and water it in. Use gloves when handling and keep away from children and pets. |
It is important to note that while chemical barriers can be effective, they should be used as a last resort and with caution. Always follow the instructions carefully and keep away from children and pets. Additionally, it is important to consider the potential harm to other animals and the environment before using any type of chemical solution.
Physical Barriers
Physical barriers are one of the most effective ways to keep moles out of your garden. They work by physically blocking the tunneling that moles use to move through your yard. There are a few different physical barrier options to choose from, including:
| Barrier Option | Pros | Cons |
|---|---|---|
| Wire Mesh Fencing | Easy to install Long-lasting Affordable |
Can be unsightly May require maintenance May not be effective against all types of moles |
| Burying Hardware Cloth | Effective at preventing moles from tunneling Can be hidden underground Durable |
May be difficult to install Can be time-consuming Can be expensive depending on the size of your yard |
| Barrier Tape | Easy to install Non-toxic Effective in small areas |
May not be effective for all types of moles May need to be replaced frequently Not practical for larger areas |
When choosing a physical barrier, it’s important to consider the size of your yard, the type of soil you have, and the type of mole activity you are dealing with. Wire mesh fencing is a popular choice because it is affordable and easy to install, but it may not be effective against all types of moles. Burying hardware cloth is more effective but can be time-consuming and expensive depending on the size of your yard. Barrier tape is a good option for small areas, but may need to be replaced frequently and is not practical for larger areas.
Tip: No matter which physical barrier option you choose, it’s important to make sure the barrier extends deep enough into the ground to prevent moles from tunneling underneath it.
How to Create a Physical Mole Barrier
Protecting your garden from moles can be a daunting task, but creating a physical mole barrier can be an effective solution to keep these troublesome critters away. By digging a trench and installing the right materials, you can create a barrier that prevents moles from burrowing into your garden. In this section, we will guide you through the steps needed to create a physical mole barrier and maintain its efficacy over time. Read on to learn more.
Step 1: Dig a Trench
To create a physical mole barrier for your garden, the first step is to dig a trench. This trench should be about 8 inches wide and 24 inches deep so that it can accommodate the barrier material and fence.
Here are some detailed steps to follow while digging the trench:
| Step | Action |
|---|---|
| Step 1 | Mark the perimeter of the area where you want to put the barrier using stakes and string. This will give you a clear guide on where to dig the trench. |
| Step 2 | Using a garden shovel or a trenching tool, dig the trench along the marked perimeter. Ensure that you create a uniform depth and width throughout the trench. |
| Step 3 | As you dig, pile the soil neatly on one side or in a wheelbarrow for easy filling in later. |
| Step 4 | Remove any weeds or roots that may get in the way of the barrier installation. |
Take your time while digging the trench to ensure you get it right. Ensure that the walls and bottom of the trench are smooth without any protrusions, which would interfere with the installation of the barrier material.
Once you have completed digging the trench, you will be ready to move on to the next step in creating your physical mole barrier – installing the barrier material.
Step 2: Install Barrier Material
To install the barrier material for your mole barrier, you will need the following materials:
- Barrier Fabric: Choose a barrier fabric that is at least 18 inches wide so that it extends well into the sides of the trench.
- Staples: Use heavy-duty staples to secure the barrier fabric to the trench walls.
- Gloves: Wear gloves to protect your hands from any sharp objects or debris you may encounter during installation.
To install the barrier material, follow these steps:
- Unroll the barrier fabric and align it along the trench walls. Make sure the fabric extends at least 6 inches above the surface to prevent any moles from burrowing under the fabric.
- Using the heavy-duty staples, secure the barrier fabric to the trench walls. Make sure to pull the fabric tight and overlap any seams or joints to prevent any gaps where a mole could potentially tunnel through.
- Continue securing the barrier fabric around the perimeter of the trench until the entire area is covered.
Note: If you encounter any rocks or roots, make sure that the barrier fabric is placed over them and not underneath. Any gaps or openings in the barrier fabric will allow moles to tunnel through, so it’s important to ensure a tight, secure fit.
Step 3: Install Fence
To install a fence as part of your physical mole barrier, follow the below steps:
- Step 1: Choose a suitable fencing material that is sturdy and rust-resistant. Some popular options are galvanized steel or welded wire mesh.
- Step 2: Measure the length and height of the trench to determine the length and height of the fence you will need.
- Step 3: Cut the fence material to the appropriate length and height using wire cutters or tin snips.
- Step 4: Attach the fence material to the wooden stakes with staples or u-shaped nails. Make sure the fence is taut and secured properly to prevent any gaps.
- Step 5: Place the wooden stakes with attached fence into the trench, making sure the fence is facing inward towards the garden. Space the stakes evenly along the length of the trench.
- Step 6: Fill in the trench with the excavated soil, packing it tightly around the fence to ensure it is secure in place.
By following these steps, you will have successfully installed a fence as part of your physical mole barrier. The fence serves as a barrier that the moles cannot burrow through or climb over, protecting your garden from their destructive behavior. It’s important to monitor your barrier regularly for any signs of wear or damage and make necessary repairs to ensure its effectiveness in keeping moles at bay.
Maintaining Your Mole Barrier
Ensuring that your mole barrier remains effective over time requires ongoing maintenance and monitoring. Without proper care, your barrier may become damaged or ineffective, allowing moles to enter your garden once again. In this section, we will discuss the importance of maintaining your mole barrier and provide tips for monitoring and repairing it as needed. By staying diligent and proactive in your efforts, you can keep your garden protected against mole infestations for years to come.
Monitoring for Mole Activity
After creating a mole barrier around your garden, it is important to monitor for any mole activity in the area. This will help you detect and address any issues early, before they cause significant damage to your plants and lawn.
One way to monitor for mole activity is to visually inspect the ground for signs of mole hills or tunnels. Check the area around your garden regularly and look for raised, volcano-shaped piles of earth, as well as raised or sunken portions of the ground that may indicate the presence of tunnels.
Another method is to use mole traps to capture and remove moles from the area. Place traps along the perimeter of your garden and check them regularly for any captures. When using traps, it is important to follow the manufacturer’s instructions for proper placement and disposal.
You can also use baited tunnels to monitor for mole activity. Baited tunnels are tubes of PVC or other material that are placed along the mole barrier line and filled with bait. Check these tunnels regularly to see if any bait has been disturbed or taken, which may indicate mole activity in the area.
To effectively monitor for mole activity, use a journal or logbook to record any signs of mole hills or tunnels, captures, or bait consumption. This will help you keep track of any patterns or changes over time and make it easier to detect any issues before they become major problems.
Regular and consistent monitoring is key to maintaining the effectiveness of your mole barrier and protecting your garden from mole damage. By following these monitoring techniques, you can ensure that your barrier remains intact and your garden stays protected.
| Monitoring Methods | Description |
|---|---|
| Visual Inspection | Regularly checking the area around your garden for signs of mole hills or tunnels |
| Mole Traps | Using traps placed along the perimeter of your garden to capture and remove moles from the area |
| Baited Tunnels | Placing tunnels filled with bait along the mole barrier line to detect and monitor mole activity |
| Journal/Logbook | Recording any signs of mole activity, captures, or bait consumption to track patterns and changes over time |
Repairing and Upgrading Your Barrier
Once you have installed a physical mole barrier around your garden, it is important to regularly inspect and maintain it to ensure it remains effective. Any damage or wear and tear to your barrier can compromise its effectiveness and allow moles to enter your garden once again.
Here are some steps you can take to repair and upgrade your mole barrier:
- Inspect your barrier regularly for any signs of damage or wear.
- If you notice any damage, such as rips or holes in the barrier material, repair it immediately to prevent moles from penetrating the barrier.
- If your barrier has been in place for a while, it may start to deteriorate due to exposure to the elements. Consider upgrading the barrier material to a more durable option that will last longer.
- In addition to the physical barrier, consider integrating other mole control methods into your garden maintenance routine, such as trapping or repellents, to provide added protection against mole infestations in case the barrier fails.
- If you find that moles are still entering your garden despite having a physical barrier in place, consult a pest control professional for further advice and assistance with mole control.
Remember, regular maintenance and inspections of your mole barrier are crucial for keeping your garden protected from these underground pests. By taking proactive steps to repair and upgrade your barrier as needed, you can ensure that your garden stays mole-free and healthy.
Conclusion
In conclusion, creating a mole barrier around your garden can be a highly effective way to protect your plants and landscaping from the damaging effects of mole activity. While there are various options for mole barriers, including natural, chemical, and physical barriers, creating a physical mole barrier can be the most durable and long-lasting solution.
To create a physical mole barrier, you will need to dig a trench, install barrier material, and install a fence. It’s important to monitor for mole activity and to make any necessary repairs or upgrades to your barrier to ensure its effectiveness.
Remember that moles are attracted to moist, rich soil, so maintaining a consistent watering and fertilization routine can also help prevent mole activity in your garden.
By taking these steps and implementing a mole barrier, you can enjoy a beautiful and healthy garden free from mole damage.
Frequently Asked Questions
Can I use essential oils to repel moles?
There is no scientific evidence to support the effectiveness of essential oils in repelling moles.
What are some natural barriers I can create?
You can use plants like daffodils or alliums, or try burying materials like gravel or thorny branches around your garden.
Do mole repellent devices work?
It depends on the device and the specific species of mole in your area. Some have found success with ultrasonic or vibrating devices, while others have not.
How deep should I dig my mole barrier trench?
You should dig the trench at least 1 foot deep to effectively deter moles.
Do coffee grounds repel moles?
There is no scientific evidence to support the effectiveness of coffee grounds in repelling moles.
Can I use chicken wire as a physical mole barrier?
Yes, chicken wire can be an effective option for a physical mole barrier. Just be sure to bury it at least 1 foot deep.
Can I use mothballs to repel moles?
No, mothballs are toxic and can harm wildlife and pets. It is not recommended to use them for mole control.
How do I know if moles are still active inside my garden?
You may notice new mounds of soil or raised ridges in your garden if moles are still active. You can also place traps or bait to confirm their presence.
Can I plant vegetables or flowers over my mole barrier?
Yes, you can plant over your mole barrier once it has been installed. Just be sure to avoid damaging the barrier while planting.
What is the best time of year to create a mole barrier?
The best time to create a mole barrier is in the spring or fall when moles are most active and easier to detect.