Are there mysterious holes and mounds popping up all over your yard? Have you tried everything to get rid of them, but they keep coming back? There’s a good chance that you have moles as uninvited guests. The elusive and destructive nature of these pests can leave even the most seasoned homeowner feeling perplexed. Fear not, for this guide will assist you in identifying mole activity, preventing damage, and trapping them humanely. By the end, you’ll have the knowledge and tools to reclaim your yard and say farewell to these pesky critters. Let’s dive in!
Identifying Mole Habits
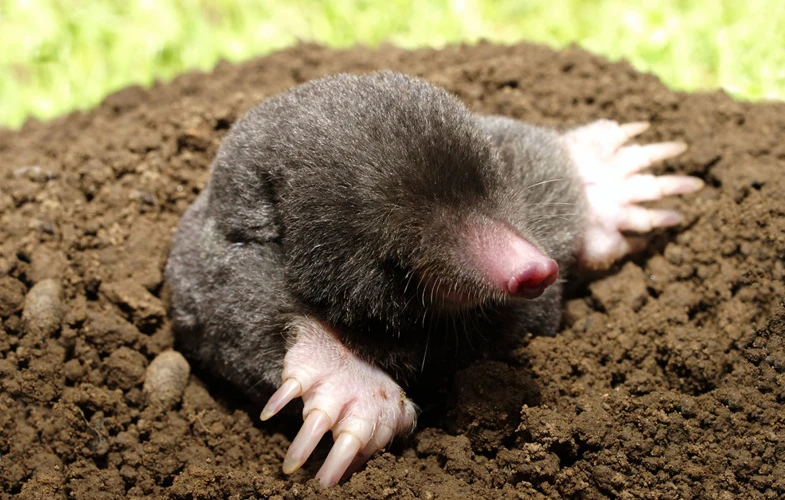
As gardeners, one of the biggest concerns in maintaining the beauty of your lawn is the presence of moles. These critters burrow through the soil, damaging plant roots and creating unsightly molehills in the process. Identifying the habitat of moles in your yard is crucial to preventing and managing mole infestations. In this section of our comprehensive guide, we will discuss various ways of identifying mole habits in your yard, including signs of mole activity, susceptible areas, and mole mounds. Understanding the specific mole habits in your yard can help you create a mole management plan that is effective in removing these pests from your property.
Signs of Mole Activity
When identifying mole activity in your yard, there are several signs to look out for. These signs include:
| Raised ridges or tunnels: | These are created by moles as they burrow through the soil in search of food. |
| Small holes: | Moles dig holes that are about 1 to 1.5 inches in diameter as an entrance to their tunnels. |
| Molehills or mounds of soil: | These are formed when moles excavate soil from their tunnels and push it to the surface. Molehills are typically shaped like a volcano, with a hole in the middle where the mole enters and exits the tunnel. |
| Damage to plant roots: | Moles might not eat roots, but their burrowing can damage the roots of grasses, garden vegetables, and flowers. |
It’s essential to regularly check your yard for signs of mole activity, especially when it comes to seasonal mole habitat behavior. Understanding the susceptibility of your yard to mole habitats can help you identify mole activity accurately. Factors like soil type (which can be learned in mole habitats removal), moisture (described in detect mole tunnels), and vegetation (mentioned in creating an unattractive to moles environment) can all contribute to mole habitats in your yard.
Susceptible Areas
Some areas in your yard are more susceptible to mole activity than others. Understanding these areas can help in identifying mole habitats and taking appropriate preventative measures. The table below provides a comprehensive guide on different susceptible areas in your yard that moles might find attractive.
| Area | Description |
| Soil Type | Moist and loamy soil makes it easier for moles to burrow and dig tunnels (learn more here) |
| Moisture | Areas with higher moisture levels due to rain or watering, especially in the spring and fall (learn more here) |
| Detect Mole Tunnels | Areas where mole tunnels are visible or lawn is raised with visible ridges (learn more here) |
| Vegetation | Places where the vegetation is less dense, providing easy access for moles to dig tunnels for cover or foraging (learn more here) |
| Seasonality | Areas where mole activity is known to increase in specific months or seasons (learn more here) |
| Unattractive Environment | Areas that have been treated with insecticides or toxic chemicals or have been modified to create an unattractive environment for moles (learn more here) |
Understanding the susceptible areas in your yard can be helpful for further prevention or removal of mole activity in your beloved home space.
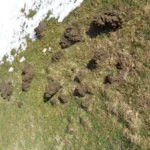
Mole Mounds
Moles are known for the unsightly “mole mounds” they create in lawns and gardens. These mounds are caused by the moles digging tunnels beneath the surface in search of food.
What do Mole Mounds look like?
Mole mounds are usually circular in shape and can vary in size from a few inches to several feet in diameter. The soil in a mole mound is typically pushed up in a conical shape, with a depression in the center where the mole enters and exits the tunnel.
What do Mole Mounds indicate?
The presence of mole mounds in your lawn or garden can be a sign of a mole infestation. By identifying where the mounds are located and how many there are, you can begin to determine the extent of the problem.
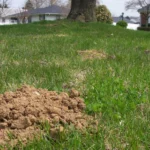
How to detect Mole Mounds?
To detect mole mounds, simply walk around your lawn or garden and look for raised patches of soil. Once you’ve found a mound, gently press on the center to see if it gives way easily. If it does, you’ve likely found an active mole tunnel.
What do Mole Mounds tell you about their habitat?
Mole mounds can also provide insight into the mole’s habitat preferences. If you consistently find mounds in the same area of your yard, it could be an indication of a particular soil type or moisture level that the moles find attractive. For more information about mole habitats, see our article on soil type mole habitats and moisture mole habitats.
How to remove Mole Mounds?
While removing mole mounds can improve the appearance of your lawn, it’s important to also address the underlying mole infestation. For tips on removing mole habitats, see our article on mole habitats removal.
| Pros | Cons |
|---|---|
| Can help identify active mole tunnels | Moles will continue to dig new tunnels and create new mounds |
| Can provide insight into mole habitat preferences | Mounds can be unsightly and damage lawns |
| Mounds can be easily detected and removed | Mounds may not indicate the full extent of the mole infestation |
Conclusion
By knowing how to identify mole mounds and what they can tell you about mole habitats, you’ll be better equipped to address a mole infestation in your lawn or garden. Remember to also focus on creating an unattractive environment for moles by following the tips in our article on creating an unattractive environment for moles.
Preventing Mole Damage
As a property owner or gardener, mole damage can be frustrating to deal with. These pests have a tendency to dig up your lawn and garden in search of food, leaving unsightly mounds and tunnels in their wake. Fortunately, there are steps you can take to prevent mole damage before it even begins. By eliminating food sources, maintaining a healthy lawn, and creating barriers, you can make your property less attractive to moles. In this section, we will explore various preventative measures to take against mole damage, so you can avoid the headache of dealing with mole tunnels and mounds. If you haven’t already, be sure to check out our section on Identifying Mole Habits to learn more about these pests’ behaviors and tendencies.
Eliminating Grub Worms
One effective way to prevent moles from damaging your lawn is to eliminate grub worms, which are a primary food source for them. Grub worms are the larvae of several species of beetles, including Japanese beetles and June beetles. If your yard has a grub infestation, you can use natural methods or commercial products to eliminate them. Some natural methods include introducing nematodes, which are microscopic worms that will feed on the grubs, applying beneficial nematodes milky spores, or using neem oil. Commercial products such as insecticides or granules can also be effective at eliminating grubs.
It’s important to note that eliminating grub worms doesn’t guarantee that moles won’t continue to visit your yard. Moles are known to eat other insects, such as earthworms, and may still find your yard attractive even without a grub supply.
To determine if your yard has a grub worm infestation, look for signs such as brown patches of grass, soft spots in your lawn, or existing mole activity. If you suspect that your yard has grubs, it’s important to act quickly before the infestation becomes too severe.
In addition to eliminating the grub worms, take steps to make your yard less attractive to moles. Keep your lawn healthy and well-maintained, remove any fallen leaves, debris or piles of grass clippings where moles might burrow, and limit any standing water in your yard. All of these efforts can help discourage moles from making your yard a frequent visit.
For more information on identifying mole habitats in your yard, see our article on vegetation-based mole habitats. If you’re interested in learning about seasonal mole habitat behavior, see our article on seasonal mole habitat behavior.
Removing Food Sources
One effective way to prevent mole damage in your yard is to remove their food sources. Moles primarily feed on insects and larvae found in the soil, particularly grubs. By reducing the number of grubs in your yard, you can discourage moles from taking up residence there.
Here are some steps you can take to remove food sources for moles in your yard:
- Use organic pest control: Instead of using chemical pesticides that can be harmful to beneficial insects, consider using organic pest control methods such as releasing beneficial nematodes into the soil. These microscopic worms will devour grubs and other harmful insects without posing any harm to your lawn or the environment.
- Reduce watering: Over-watered lawns create an ideal environment for grubs to thrive. By reducing watering to just what is necessary for a healthy lawn, you can discourage grub populations from growing.
- Avoid over-fertilization: Fertilizing your lawn with nitrogen-rich fertilizers can also promote grub growth. Reduce the amount of fertilizer you use and opt for a fertilizer that is low in nitrogen.
- Handpick grubs: For small infestations, you can physically remove grubs by hand. This method may not be practical for larger areas, however.
- Use a grub control product: If your grub population is too large to manage by hand, consider a grub control product specifically designed to kill grubs. Be sure to follow the product instructions carefully.
By removing the food sources that attract moles to your yard, you can significantly reduce the likelihood of mole damage. These methods are effective, safe and eco-friendly, and they can also help promote a healthier lawn.
Maintaining a Healthy Lawn
Maintaining the lawn in your yard is not only important for aesthetic reasons but also to prevent mole damage. A healthy lawn with deep roots makes it difficult for moles to burrow, as the soil is compact and less conducive to forming tunnels. Here are some tips for maintaining a healthy lawn:
| Tips for Maintaining a Healthy Lawn: | Description: |
|---|---|
| 1. Regular Mowing | Mowing your lawn on a regular basis not only enhances its appearance, but it promotes thicker growth, making it difficult for moles to dig tunnels. |
| 2. Proper Watering | Make sure to water your lawn deeply and infrequently to encourage deep root growth. Shallow watering can lead to weak roots, which can increase the risk of mole damage. |
| 3. Aeration | Aerating your lawn every year or two helps loosen compacted soil, allowing air, water, and nutrients to penetrate the roots and promoting healthy growth. |
| 4. Fertilizing | Applying fertilizer to your lawn can promote healthy growth and can help create a dense lawn that is difficult for moles to tunnel through. |
| 5. Overseeding | Overseeding your lawn can help fill in bare spots, creating a uniform and dense lawn that discourages mole activity. |
By following these tips, you can create a lawn that is less susceptible to mole damage, making it easier to control and prevent any unwanted tunneling.
Creating Barriers
One effective method of preventing moles from damaging your yard is by creating physical barriers to deter their movement. Here are some ways you can create barriers to keep moles at bay:
- Fencing: Installing a proper fence around your yard can be a good way to prevent moles from entering your property. The fence should be buried at least 2 feet deep and have mesh no larger than 1/4 inch to prevent the moles from burrowing through or slipping under.
- Rock beds: Creating a barrier using rock beds can also be an effective way to prevent moles from burrowing in your yard. Place large rocks or gravel around the perimeter of your yard to create an obstacle that is difficult for moles to burrow through.
- Wire mesh: Another way to create a barrier is to use wire mesh buried at least a foot into the ground and extending at least a foot above the surface. This will create a barrier that the moles will not be able to penetrate.
- Plant borders: Planting trees, bushes, or other plants around the perimeter of your yard can also create a barrier that moles are less likely to cross. Moles typically prefer open areas over densely vegetated ones.
Keep in mind that even with the best barriers, moles may find a way to tunnel under or around them. It’s important to combine barrier methods with other preventative measures such as removing their food sources and maintaining a healthy lawn.
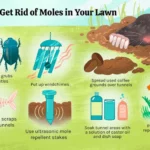
Using Repellents
Using Repellents
In addition to eliminating food sources and maintaining a healthy lawn, using repellents can also help deter moles from your yard. Here are some common types of repellents and how to use them:
| Repellent Type | How It Works | How to Use |
|---|---|---|
| Castor Oil | Castor oil coats the soil and makes it unpleasant for moles to tunnel through. | Mix 1 cup of castor oil with 2 tablespoons of dish soap in a gallon of water. Apply with a garden sprayer to areas where moles have been active. |
| Sound Repellents | High-frequency sound waves irritate moles and make them want to leave the area. | Place the device in the ground near areas of mole activity. Follow the manufacturer’s instructions for placement and frequency settings. |
| Mothballs | The strong scent of mothballs repels moles and other pests. | Place a few mothballs in areas of mole activity, such as near the entrance to a mole tunnel. |
| Repellent Plants | Some plants, such as daffodils, alliums, and marigolds, are known to repel moles. | Plant these repellent plants near areas of mole activity. |
It’s important to note that while repellents can be effective, they may not provide complete protection against moles. Using a combination of prevention methods, including eliminating food sources and maintaining a healthy lawn, is the best way to control mole activity in your yard.
Trapping Moles
As much as we try to prevent mole damage in our yard, sometimes trapping them becomes necessary. It can be a daunting task to catch a mole, but with the right approach and tools, it can be done successfully. In this section, we will explore some effective trapping methods to help you get rid of moles in your yard. So grab your gloves and let’s get started!
How to Set Traps
To set traps for moles, it is important to follow a few simple steps that will increase the likelihood of catching the elusive creatures. Here is a step-by-step guide on how to set traps for moles:
| Step 1: | Choose the right traps. There are a few different types of traps available for catching moles, including scissor-jawed, harpoon, and tunnel. Make sure you choose the right trap for your situation. |
| Step 2: | Locate active mole tunnels. Look for raised ridges or molehills to identify active tunnels. You can also use a shovel to gently press down on the mole’s runway, leaving behind an indentation that will show you which tunnel is active. |
| Step 3: | Prepare the area. Clear away any debris or vegetation that might interfere with the trap’s operation. Make sure the area around the tunnel is level so the trap sits properly. |
| Step 4: | Bait the trap. Moles are attracted to earthworms and grubs, so use these as bait. Place a few in the trap to entice the mole to come closer. |
| Step 5: | Set the trap. Follow the manufacturer’s instructions to properly set the trap. In most cases, this will involve compressing the springs or levers that will trigger the trap when the mole enters the tunnel. |
| Step 6: | Check the trap. Monitor the trap regularly to see if you have caught a mole. If the trap doesn’t catch anything after a few days, move it to a new location along an active tunnel. |
| Step 7: | Dispose of the mole. Once you have caught a mole, wear gloves to remove the trap and the mole from the tunnel. Place the mole in a sealed bag and dispose of it properly. |
By following these steps, you can increase your chances of catching moles in your yard and preventing them from causing damage to your lawn and garden. Remember to always use caution and safety when setting traps, and to consult with a professional if you have any concerns.
Best Trapping Locations
When setting traps to catch moles, it’s important to choose the best locations for maximum effectiveness. Identifying the areas where moles are active is crucial in determining the best areas for trap placement. Here are some of the best trapping locations to consider:
| Location | Description |
|---|---|
| Active Mole Tunnels | Moles prefer to use the same tunnels repeatedly, so setting traps in these locations is ideal. Look for raised ridges or surface tunnels in your yard, and set traps nearby. |
| Mole Mounds | Mole mounds are an indication that a mole has been actively tunneling in that spot, and can be a prime location for trap placement. Carefully remove the top of the mound, identify the direction of the tunnel, and set the trap just inside the opening. |
| Along Fences, Foundations, and Hedges | Moles like to tunnel alongside barriers, such as fences, walls, and hedges, providing another good opportunity to set traps. Check for signs of activity along these borders, and place traps accordingly. |
| Under Active Plants | Moles may be attracted to areas with active gardens and plants, as they can easily find grubs and worms in the soil. Set traps carefully around the root system of active plants. |
| Near Water Sources | Moles may be attracted to water sources, such as streams or sprinkler systems, as they provide moist soil that is easier to dig through. Check for signs of activity near these areas and set traps accordingly. |
Selecting the right placement for mole traps is key in catching moles and reducing their activity in your yard. Always wear gloves when handling traps, and be sure to follow safety precautions for proper trap placement. By identifying the best trapping locations, you can effectively trap moles and prevent future damage.
Types of Mole Traps
When it comes to trapping moles, there are various types of traps available. Each type of trap works differently, so it’s important to choose the right one for your needs. Here are a few common types of mole traps to consider:
| Trap Type | Description |
|---|---|
| Spear Trap | This is a spring-loaded trap that impales the mole with a sharp spear when triggered. |
| Scissor Trap | This trap uses scissor-like blades to crush the mole when triggered. |
| Choker Trap | This type of trap consists of two spring-loaded arms that close around the mole’s neck when triggered, killing it quickly. |
| Tunnel Trap | A tunnel trap is designed to be placed in the mole’s tunnel. It catches the mole as it moves through the tunnel, without harming it. |
It’s important to note that each of these traps requires proper placement and setup to be effective. Improper placement or setup can result in the trap not working properly or harming non-target animals. It’s also important to follow all safety guidelines when setting and handling mole traps to prevent injury to yourself or others.
Mole Trap Safety
When it comes to trapping moles, safety is of utmost importance. Before setting any traps, it’s important to familiarize yourself with the proper safety measures. Here are some key points to keep in mind:
| Wear Gloves | Always wear gloves when handling mole traps. This will protect your hands from any sharp edges or springs that could cause injury. Additionally, gloves will help to mask your scent, making it more likely that the mole will take the bait. |
| Keep Traps Away from Children and Pets | Set traps in areas that are out of reach of children and pets. The last thing you want is for a curious child or playful pet to accidentally trigger a trap and get hurt. |
| Read Instructions Carefully | Before setting any traps, be sure to read the instructions carefully. Different traps may have different requirements for bait placement, tension, and trigger mechanisms. Following the instructions will help ensure that the trap is set correctly and safely. |
| Check Traps Regularly | To minimize the suffering of the trapped animal, it’s important to check the traps regularly. Depending on your local laws and regulations, you may also be required to release any non-target animals that get caught in your trap. |
| Dispose of Traps Safely | When you’re finished trapping, it’s important to dispose of the traps properly. In some cases, you may be able to reuse the traps. However, if a trap is damaged or has been exposed to a diseased animal, it should be disposed of safely to prevent any potential health hazards. |
By following these safety tips, you can successfully trap moles without putting yourself, your family, or your pets in danger.
Conclusion
In conclusion, identifying and dealing with mole habitats in your yard can be a challenging task. However, by understanding the signs of mole activity and knowing which areas of your yard are most susceptible to mole damage, you can take proactive steps to prevent mole infestations. This might mean eliminating grub worms, removing food sources, maintaining a healthy lawn, or creating barriers using repellents.
In addition, trapping moles can be an effective way to remove these little underground creatures from your yard, but it’s important to do so safely and ethically. When setting traps, be sure to follow proper procedures and choose the best locations for trapping. Also, consider using the right type of mole trap for your situation.
Remember that mole control is an ongoing process that requires patience and persistence. Repopulation can happen in just a matter of weeks, so continue to be vigilant about monitoring your yard for signs of mole activity.
By following the tips and techniques discussed in this guide, you’ll be better equipped to identify mole habitats in your yard and take the necessary steps to control these pesky critters. So take action today and give your lawn the care it deserves!
Frequently Asked Questions
How can I tell if I have moles in my yard?
Look for raised ridges, pushed-up surface tunnels, or mounds of dirt. These are signs of mole activity.
Why do moles like my yard?
Moles like to tunnel through areas with loose, moist soil where they can find plenty of insects and grubs to eat.
Do moles pose any risks to my health?
No, moles do not pose any known health risks to humans. However, their tunnels and mounds can damage your plants and lawn.
Will moles eventually leave on their own?
No, moles will not leave on their own. If they find a good source of food and water, they will stay in the area until their food supply runs out.
How can I eliminate grub worms from my lawn?
Use nematodes, milky spore, or chemical insecticides to eliminate grub worms from your lawn.
What are some natural ways to repel moles?
Plant daffodils or marigolds, sprinkle castor oil, or use a garlic-mint spray to repel moles.
What types of barriers can I use to keep moles out of my yard?
You can use wire mesh, landscaping fabric, or gravel to create barriers that moles cannot tunnel through.
Can I relocate a trapped mole to a different location?
No, it is illegal in most states to relocate trapped moles. They must be euthanized.
What should I do if I accidentally trap a non-target animal?
Release the animal immediately and reset the trap. Make sure to supervise the trap closely to prevent any further accidental trappings.
Is it safe to handle a live mole?
No, it is not safe to handle a live mole. Moles are wild animals and can carry diseases or bite if they feel threatened.