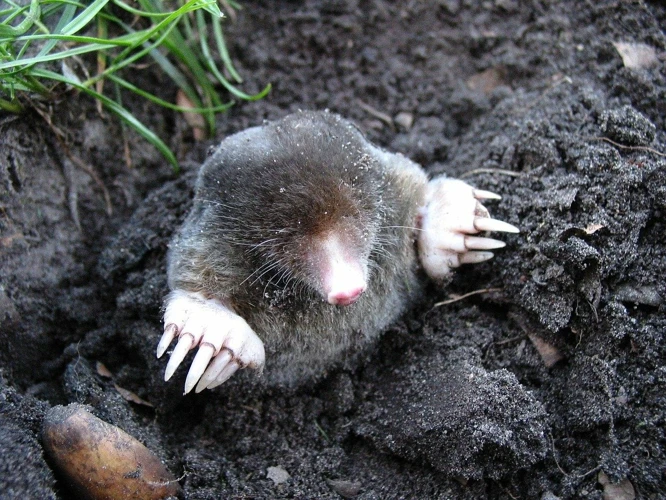
Have you ever looked out at your yard and noticed unsightly tunnels and mounds of dirt? Or worse, have you stepped outside to find that your once pristine garden now looks like a minefield thanks to mole infestations? It can be perplexing and frustrating to deal with these elusive creatures, but before you resort to extreme measures, it’s important to understand the root of the problem. Removing mole habitats is a crucial step in effective mole control and prevention. So, let’s explore why this is so important and what steps you can take to keep your yard and garden mole-free.
Why Mole Habitats Must be Removed
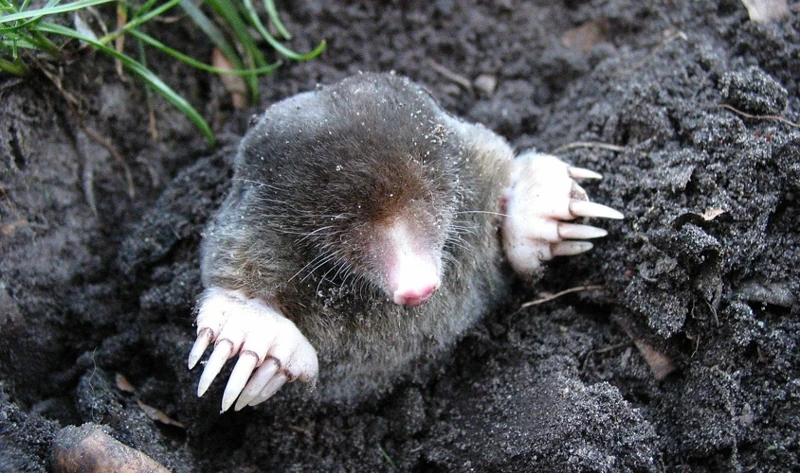
As homeowners, we all strive to keep our property looking healthy and inviting. However, pesky moles can ruin the beauty of a lawn by creating unsightly tunnels and hills. Not only do mole habits detract from the aesthetic appeal of a yard, but they can also cause significant damage to plants and garden beds. In this next section, we will explore the reasons why it is crucial to remove mole habitats from your yard, and how to effectively do so to prevent future infestations. Understanding the importance of removing mole habitats can help you maintain a healthy and beautiful yard for years to come.
1. Mole Habitats Attract Moles
Moles are subterranean animals that burrow in soil in search of food. They are known to create extensive tunnel networks, which they use to move around and hunt for insects and grubs. As they do so, they create mole habitats that are characterized by specific environmental conditions.
Mole habitats can attract other moles, particularly during the breeding season, when they are looking for mates. They are also more likely to inhabit areas where they can find food and water easily. This means that areas of your yard that are more attractive to moles are more likely to be infested.
To prevent mole infestations, it is important to understand what makes a mole habitat attractive to moles in the first place. This could include a variety of factors such as soil type, moisture levels, the presence of certain plants, and how tidy the area is. By removing these things, you can make your yard less attractive to moles and discourage them from taking up residence.
Here are some common factors that may make an area of your yard more attractive to moles:
| Factor | Description |
| Soil Type | Moles prefer loose, moist soil that is easy to dig through. |
| Moisture | Moles need water to survive, so areas with high moisture levels are more attractive to them. |
| Vegetation | Moles are attracted to areas of the yard where they can find plenty of grubs and insects to eat. |
| Tidy Yard | Areas of the yard with organic debris, such as fallen leaves or overgrown grass, can provide cover for moles and make it easier for them to move around undetected. |
By identifying these factors and taking steps to remove them, you can make your yard less hospitable to moles and reduce the likelihood of an infestation. This is an important step in effective mole control and can help prevent damage to your lawn and garden.
2. Removing Mole Habitats Discourages Future Mole Infestations
Removing Mole Habitats is a crucial step in effective mole control. Once moles have established their habitat in your yard, they are likely to stay and multiply. These little creatures have a rapid reproduction rate, which can result in a full-blown mole infestation in no time. Removing the habitats where they reside is an effective way to discourage moles from infesting your yard in the future.
By eliminating mole habitats, you make it difficult and unattractive for moles to stay in your yard. If moles do not feel comfortable in a particular area, they are more likely to move on to another place that offers them better shelter and food sources. This is particularly important because a single mole can dig an extensive tunnel network of 100 feet or more in just one day. By removing their habitat, you are creating a hostile environment that moles will not find attractive.
In addition to discouraging moles from infesting your yard, removing their habitats can also reduce the amount of damage they do. Moles often dig in search of food, which can uproot plants and damage lawns. Without a habitat to call their own, moles will find it hard to burrow and dig their way through your yard, meaning that any damage they do will be minimal.
To ensure proper mole control, it is necessary to remove their habitats. Understanding the different ways to identify and remove them is crucial. You should remove mole habitats as soon as possible to prevent them from colonizing your yard.
Identifying Mole Habitats
When dealing with a mole infestation problem in your yard, it’s important to identify areas where moles tend to create habitats. By doing so, you can take the necessary steps to remove those habitats and discourage moles from returning. So, how can you identify these mole habitats? Let’s explore some signs you can look for to detect them. To learn more about detecting mole tunnels, visit this article. If you want to create an unattractive environment for moles, check out this guide. Finally, to understand seasonal mole behavior better, read this article.
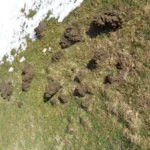
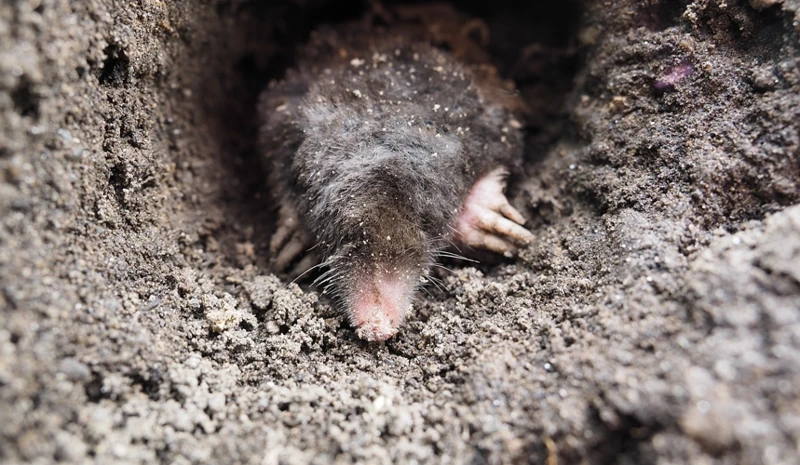
1. Surface Tunnels
When dealing with mole infestations, it’s important to first identify their habitats. One of the signs of mole habitats are surface tunnels. These are tunnels that are visible on the surface of your lawn, and they’re usually about 2 inches wide. You can identify them by looking for raised ridges of soil.
| Signs of Surface Tunnels | What it Means |
|---|---|
| The tunnel is wide and shallow | This could be an indication of a new mole infestation or one that has just begun |
| The tunnel is narrow and deep | This indicates an established mole habitat, which is more difficult to get rid of |
| The tunnel is connected to a molehill | The molehill serves as a main entrance to the mole’s habitat |
It’s important to note that moles don’t hibernate and are active year-round. If you notice a surface tunnel, it’s best to take action as soon as possible to prevent further damage to your lawn.
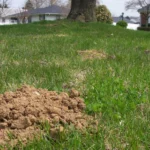
2. Molehills
Molehills are another common sign of mole activity in your yard. These are the circular mounds of soil that moles push up from their tunnels as they dig. Identifying molehills is important because it indicates that there is a mole colony living beneath the soil. Molehills may also be accompanied by surface tunnels or damage to plant roots.
When removing mole habitats, it is important to address the molehills as well. This is because they may contain the entrances to active tunnels that the moles are using to access your yard. If left untreated, these tunnels can quickly expand and cause further damage to your lawn and garden.
To remove molehills, follow these steps:
- Use a shovel or a gloved hand to break up the molehill and remove as much soil as possible.
- Inspect the soil for moles or their tunnels. Look for small holes in the soil that are about the size of a quarter or larger.
- Fill in the hole with soil and tamp it down to prevent further tunneling.
- Repeat this process for any other molehills in the area.
By removing the molehills and filling in any active tunnels, you are removing the moles’ access points to your yard. This, in turn, can discourage moles from staying in your yard and reduce the likelihood of future mole infestations.
3. Damaged Plant Roots
Healthy plant roots are essential to the growth and survival of plants. Unfortunately, mole habitats can cause severe damage to plant roots, which may ultimately kill the plants. Plant roots are typically below the soil surface, making it challenging to identify mole damage. However, damaged plant roots are often the first sign of mole infestation in your garden or lawn.
When moles dig through the soil, they often uproot or cut through the roots of plants in the process. This damage can lead to unhealthy or even dead plants. If you notice plants appearing wilted or dying without an apparent cause, it’s worth checking the root system for mole damage.
To help identify mole root damage, look for plants or parts of plants that have been uprooted or appear wilted or dead. If you gently tug on the plant, and it comes out of the ground with minimal resistance, this can be an indication of mole activity.
Here’s a table outlining the common signs of mole damage to plant roots:
| Common Signs of Mole Damage to Plant Roots |
|---|
| Uprooted plants or parts of plants |
| Wilted or dead plants |
| Damage to the root system, including tunnels or holes around the roots |
| White, grub-like insects in the soil, which are a food source for moles and can attract them to your garden |
If you notice any of these signs of mole damage to plant roots, it’s essential to take action quickly to prevent further damage. Removing the habitats that attract moles, such as piles of organic debris, can help discourage future mole infestations and ultimately protect your lawn and garden from damage.
4. Grubs & Insects
Grubs and insects are a major attraction for moles as it makes for an easy and plentiful food source. Moles have a very high metabolism and require a large amount of food to sustain themselves. Grubs and insects are a good source of protein and nutrients for these small creatures. To effectively remove mole habitats, it is important to eliminate the availability of these food sources in the soil.
Here are some common insects that may attract moles:
| Insect Type | Description |
|---|---|
| Grubs | Small, worm-like larvae of various types of beetles. |
| Earthworms | Long, thin worms that live in soil and are an important part of many ecosystems. |
| Ants | Small, social insects that live in colonies and are known for their organized behavior. |
| Beetles | A diverse group of insects with many different species and appearances, known for their hard shells. |
Eliminating these insects can be challenging, since they are an important part of many ecosystems. However, with proper lawn care techniques and use of insecticides, grub populations can be decreased. In addition to removing moles’ food sources, this will benefit the overall health of the lawn.
It should be noted that using insecticides can have negative impacts on other beneficial insects and wildlife, so it is important to follow product label instructions carefully and use these products responsibly.
How to Remove Mole Habitats
Now that you know why removing mole habitats is crucial for effective mole control, it’s time to learn how to do it. Removing mole habitats might be a challenging task, but it is necessary to protect your yard from these unwanted pests. In this section, we will guide you through some effective ways to eliminate mole habitats from your yard. Follow these steps carefully, and you will be on your way to a mole-free lawn.
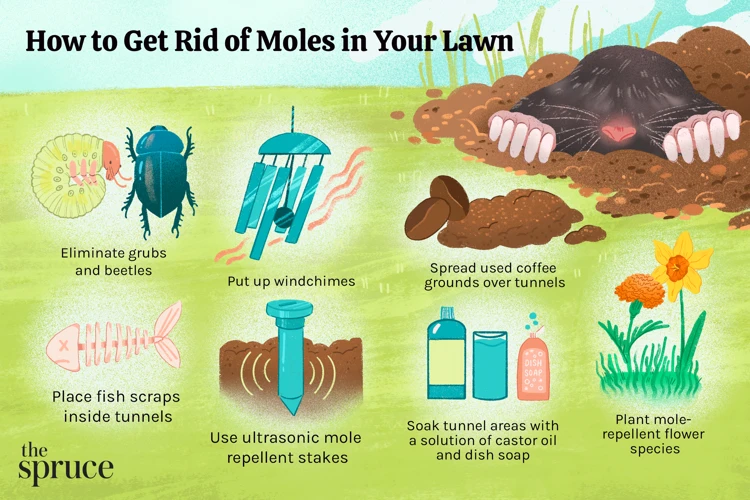
1. Remove Organic Debris
To effectively remove mole habitats, the first step is to get rid of any organic debris that may exist in your yard. This includes fallen leaves, grass clippings, and other yard waste. Moles are attracted to areas with a lot of organic material, as it provides them with ample food sources such as worms and insects.
Here are some steps to remove organic debris:
- Start by raking up any leaves or grass clippings in your yard. This will help expose any mole tunnels or nests that may be hidden underneath the debris.
- Dispose of the organic material properly in your compost bin or yard waste bag. Do not leave it in a pile in your yard, as this can still attract moles.
- Go over the area with a lawn sweeper or leaf blower to collect any remaining debris that may be missed.
- Don’t forget to remove any dead or decaying plant material from your garden beds as well. This not only helps with mole control, but also promotes healthy plant growth.
By removing organic debris from your yard, you are taking away the food sources that moles need to survive. This will make your yard less appealing to them and discourage them from making nests and tunnels in your lawn. It is an important step in effective mole control.
2. Level Ground
To effectively remove mole habitats, it is crucial to level the ground. Moles prefer to tunnel in areas with an uneven surface, making this step important in preventing future mole infestations. To level the ground, consider the following steps:
- Mow the area where mole tunnels are present. Mowing the area helps remove any tall grasses or weeds mole may be using as cover, making it easier to identify and remove the tunnels.
- Remove any rocks or debris that may be present on the ground. These can create an uneven surface, which moles find attractive.
- Loosen the soil in low areas, and distribute it evenly to avoid creating depressions that can attract moles. Avoid compacting the soil after leveling it.
- Consider planting grass or other ground cover to help stabilize the soil.
By taking the time to level the ground, you will make your property less attractive to moles, reducing the risk of future mole infestations. Remember, prevention is key to effective mole control.
3. Fill Holes & Tunnels
One effective step in removing mole habitats and controlling their presence in your yard is by taking the time to fill any holes and tunnels that they have created. By doing so, you can discourage moles from using your yard as their habitat in the future.
To fill any holes or tunnels made by moles, follow these steps:
1. Dig out the opening of the holes and tunnels: Use a small shovel to dig out the openings of the holes and tunnels. This will make it easier for you to fill them in completely.
2. Fill the holes and tunnels: Fill the holes and tunnels completely with soil or sand. Make sure to pack the soil or sand tightly, so there are no gaps left for moles to use.
3. Tamp the ground: Once the holes and tunnels are filled in, tamp the ground with a flat or rounded tool, such as a tamper or the back of a hoe. This will help to compact the soil, so it is harder for moles to dig through.
4. Repeat the process: Repeat this process for all the holes and tunnels in your yard that you find. It may take some time to locate all of them, so be thorough in your search.
By filling in any holes and tunnels that moles have created, you can make it more difficult for them to use your yard as their habitat. This, in turn, can discourage them from returning in the future.
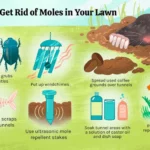
4. Use Repellents
One effective method of removing mole habitats is to use repellents to deter moles from returning to your yard. Here are some types of mole repellents you can use:
- Castor oil-based repellents: These repellents are derived from castor oil and are highly effective at repelling moles. They work by making the soil and grass taste and smell unpleasant to the moles, causing them to move on to other areas.
- Plants-based repellents: Some plants, such as daffodils, alliums, and fritillaries, are known to be unattractive to moles. Planting them in your yard can help deter moles from inhabiting your space.
- Sonic repellents: These types of repellents emit high-pitched sounds that are unpleasant to moles. They work by creating an environment that is uncomfortable for the moles and makes them want to leave.
- Vibration repellents: These repellents create underground vibrations that make the moles think predators are nearby. This makes them feel unsafe and prompts them to move to another location.
It is important to note that repellents alone may not be enough to get rid of a mole infestation, especially if the moles have already established their habitat in your yard. It is recommended to use repellents in combination with other methods such as removing organic debris and filling holes and tunnels. Additionally, prevention measures should also be taken to keep moles from returning to your yard in the future.
Prevention is Key
As the old saying goes, an ounce of prevention is worth a pound of cure. This is especially true when it comes to mole control. Once moles have invaded your yard, getting rid of them can be a time-consuming and challenging experience. It is much easier and more effective to take preventative measures to discourage moles from making your property their home in the first place. In this section, we will discuss some key strategies for preventing mole infestations and keeping your yard mole-free.
1. Keep Your Yard Clean & Tidy
Maintaining a clean and tidy yard is crucial when it comes to mole control. Here are some tips to help you keep your yard in tip-top shape:
- Remove debris: Clear any unnecessary debris such as piles of old leaves or twigs. Moles love to feed on grubs and insects that may live in such materials. By removing excess debris from your yard, you can reduce their food sources and make your yard an unattractive location for moles.
- Mow your lawn: Keeping your lawn neatly trimmed can also help control the mole population in your yard. Short grass makes it more difficult for moles to create surface tunnels, which can help reduce infestations.
- Prune plants: Moles love using roots as a food source. Prune shrubs and trees to help prevent them from becoming a habitat for moles. As a bonus, pruning can also increase the amount of sunlight that reaches your lawn, aiding in grass growth.
- Eliminate weeds: Weeds are another place where moles can hide and thrive. Pulling weeds by hand or using herbicide can keep your yard free from unwanted guests.
By following these tips, you can make your yard less hospitable to moles and reduce the chance of them taking up residence in the first place. A clean and tidy yard is not only more attractive to humans, but less attractive to pesky moles as well.
2. Use Plants that Moles Dislike
One effective way to prevent moles from making a home in your yard is by using plants that they dislike. By planting such flora, you can reduce the attraction of the area to moles and other burrowing creatures. Below are some examples of plants that are known to repel moles:
| Plant | Reason Moles Dislike |
|---|---|
| Daffodils | Contains Lycorine, a substance that is toxic to moles and other burrowing animals. |
| Alliums | Produces an offensive odor that repels not only moles but other pests as well, such as rabbits and rodents. |
| Fritillaries | Exudes a chemical called “imperialine,” which is toxic to moles and other burrowing animals. |
| Marigolds | Emits a pungent odor that moles find unappealing. |
| Crown Imperials | Produces a strong smell that moles find uncomfortable. |
These plants not only serve as a natural mole repellent, but they can also add a colorful touch to your yard. Keep in mind that while proven effective, planting these plants alone may not completely eradicate moles from your property. It is important to incorporate a combination of strategies for effective mole control.
3. Use Barriers
Barriers are a highly effective method of keeping moles out of your yard. The principle here is simple: erect some physical barriers that will either prevent moles from entering your property or frustrate them so much that they will leave on their own accord. There are a number of different types of barriers that you can use.
Some effective barriers include:
- Wire Mesh Barriers: These are a great option for keeping moles out of gardens and flower beds. Simply lay a layer of wire mesh over the area you wish to protect before covering with soil or mulch.
- Fencing: Erecting fencing around the perimeter of your property can be an excellent way of keeping moles out. Just make sure that the fencing goes down at least a foot below the surface of the ground, as moles are able to burrow quite deep.
- Stone or Gravel Barriers: Moles do not like to burrow through dense, rocky soils. Consider laying a layer of stones or gravel beneath the topsoil in your garden, or creating a gravel pathway around the perimeter of your property to deter moles from entering.
The most important thing to remember when using barriers is to make sure that they are installed properly. It’s not enough to simply lay down a layer of wire mesh or gravel – you must make sure that the barrier is flush with the ground to ensure that moles are unable to sneak underneath.
Here are some tips to keep in mind when using barriers:
- Make sure that any seams or gaps in your barriers are sealed tightly. Moles are very adept at finding even the smallest entryway into your yard.
- Be aware that barriers may not be a foolproof solution. In some cases, determined moles may still be able to find their way past your barriers or simply dig underneath them.
- Use multiple types of barriers for added protection. For example, combining wire mesh barriers with a layer of stones or gravel can be a highly effective way of keeping moles out.
By using barriers in combination with other mole control methods, you can create an almost impenetrable defense against these pesky critters. Remember to always be vigilant and check your barriers regularly to ensure that there are no gaps or seams that have been compromised. With a little bit of effort, you can effectively keep moles out of your yard for good.
Conclusion
In conclusion, it is vital to remove mole habitats to ensure effective mole control. By removing mole habitats, you not only discourage future mole infestations but also reduce the chances of attracting moles to your yard or garden. It is essential to identify these habitats and take the necessary steps to remove them. Surface tunnels, molehills, damaged plant roots, and grubs & insects are common indicators of the presence of moles. You can remove mole habitats by cleaning up organic debris, leveling the ground, filling holes & tunnels, and using repellents.
To prevent future mole infestations, it is crucial to maintain a clean and tidy yard, use plants that moles dislike, and use barriers to prevent moles from entering your yard or garden. Prevention is always key when it comes to mole control. Remember, the longer a mole infestation goes unnoticed and unaddressed, the harder it becomes to control.
By following these steps, you can minimize the damage caused by moles and maintain a beautiful, healthy yard or garden. It is essential to act quickly if you suspect a mole infestation to prevent severe damage to your yard or garden. In summary, removing mole habitats is an essential step in effective mole control, and prevention is key to maintain a healthy yard or garden.
Frequently Asked Questions
1. Can moles cause damage to my plants?
Yes, moles can cause damage to your plants by uprooting them or damaging their roots.
2. How do I know if I have a mole infestation?
You can identify a mole infestation by the presence of molehills and surface tunnels in your yard.
3. Are moles harmful to humans?
No, moles are not harmful to humans. They do not carry diseases and typically prefer to avoid human contact.
4. Can I physically remove moles from my yard?
While it is possible to trap and physically remove moles from your yard, it is not recommended unless you have experience handling wild animals.
5. Do mole repellents really work?
Some mole repellents can be effective at deterring moles, but they may not work in all situations. It’s important to use them in conjunction with other methods for maximum effectiveness.
6. Can I prevent moles from entering my yard in the first place?
While there is no foolproof way to prevent moles from entering your yard, there are steps you can take to make your yard less inviting, such as using plants that moles dislike or using barriers around the perimeter of your property.
7. Will removing mole habitats harm other wildlife in my yard?
No, removing mole habitats will not harm other wildlife in your yard. Moles are solitary creatures and do not provide important ecological benefits like other animals might.
8. Can I use chemical pesticides to get rid of moles?
While some chemical pesticides may be effective at killing moles, they can also harm other wildlife and pollute the environment. It’s best to use non-toxic methods for controlling mole populations.
9. Can I hire a professional to remove moles from my yard?
Yes, there are professional pest control services that can help you remove moles from your yard. However, this can be an expensive option and may not be necessary for all situations.
10. How long does it typically take to remove mole habitats and control an infestation?
The length of time it takes to remove mole habitats and control an infestation can vary depending on the severity of the problem and the methods used. It may take several weeks or months to fully eradicate mole populations from your yard.